About Me

My photo
I am a married woman with children out of the home now developing my own interests, hobbies making my way through the heat of the experiences and days of my life. (Click on pictures to enlarge.)

Followers

Showing posts with label Comfort Food. Show all posts

Monday, October 3, 2011

Roasted Vegetable Salsa

I love the Fall!! Harvest time! My hubby and I went yesterday to the Apple Barn in town, and came home with a box full of vegetables.
My big catch of the day was a huge bag of Heirloom tomatoes and Peppers. It screamed Salsa to me in the kitchen, I swear it did!
Some of the vegetables that came home with us!

Roasted Vegetable Salsa

3 large Tomatoes, quartered
2 large Red Peppers, quartered.
1/2 Red Onion, cut in slices.
6 cloves Garlic
Coat vegetables in Olive Oil, sprinkle liberally with Salt and Pepper and spread out on a large cookie sheet to roast. Roast in 425 degree Oven for about 10 to 15 minutes.
When vegetables have finished roasting put them into your food processor and add:
1/2 tsp. Ground Cumin
1 tsp. Hot Red Pepper flakes
1/2 tsp. Salt
1/2 tsp. Pepper
Zest and Juice from one lime
A generous handful of torn Basil Leaves.
Process by pulsing salsa in the food processor. I like my salsas to be chunky rather than smooth. Taste and adjust your seasonings to taste.
For this Salsa we wanted to keep it hot rather than chilling it for our dinner. Salsa takes on a whole different taste when you serve it warm.
With the leftover salsa, you can chill the salsa and serve it next time with additional ingredients depending on your tastes. I like to add chopped up fruit such as Mango, Peach or Nectarines. It is also good with chopped up Avacado, grilled corn and black beans added to it as well. Serve with Tortilla Chips.


We served our Hot Salsa over Spaghetti Squash, Hassselback Potatoes and Baked Chicken.
Another hint with your homemade Salsas is to change up your herbs you add. Most Salsas have Cilantro added, but I like to add other herbs instead such as Basil. It totally changes the taste of your Salsa.
And of course you can make your salsa with Fresh Vegetables rather than roasting the vegetables. Roasting brings out sweetness of the vegetables.
Linking up with:


Monday, August 1, 2011

Deep Fried Dill Pickles

DEEP FRIED DILL PICKLES

I first tryed Deep Fried Dill Pickles a couple of years ago in an English Fish and Chip Shop and fell in love with them right away. They have been on my mind to try again ever since.  Last week I again found them at the local pub.
These little snacks have everything going for them. The salty and sour of the pickles, the savoury spices in the coating mix, the creamy dip that goes with it. 
1 jar Bick Dill Pickles with Garlic
2 Eggs
1 1/2 cups Seasoned Bread Crumbs
1 tsp. Garlic Powder
2 tsp. Cayenne Pepper (or to taste)
1 tsp. Black Pepper
Oil for deep frying.

Dip:
1/2 cup Bick Zesty Onion Relish
1/2 cup Sour Cream
Combine dip ingredients in a small bowl.

1) Preheat oil in deep fryer to 375 degrees. Drain and rinse pickles, cut into quarter slices lengthwise and pat dry. Lightly mix eggs in small bowl with fork, until frothy. Combine bread crumbs and seasonings in separate bowls.
2) Dip each pickle stick into the egg, then into the breadcrumb mixture. Fry in small batches, 45 to 60 seconds, until golden brown and crispy. Serve with dip.
(For a thicker coating, dip in egg, then breadcrumbs then again in egg and breadcrumbs.)

You will never be able to eat just one!!
I am linking up with:


Monday, July 18, 2011

Tempt My Tummy Tuesday

I just discovered this meme and I couldn't be more excited! A place to share some of my recipes and direct my friends and family here to check out my latest creations! I am always on the lookout for fun, delicious and different recipes and I always seem to have people who are willing to give them a try!!
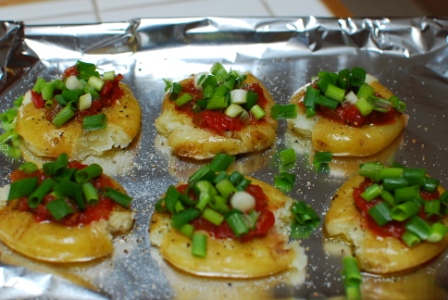
This one came about thinking of Pizza but not wanting to have the crust that comes with it.

SMASHED CRASH POTATO PIZZAS.
Start with small New Potatoes. Wash and parcook potatoes until soft but still somewhat firm enough to hold thier shape.

After parcooking, coat potatoes in Olive Oil, and place on foil lined baking sheet.

Using a Potato Masher, apply enough pressure on the top of the potato to smash it flat!! Try to make sure it keeps a lot of its shape though. There is still stuff to go on top of it!

Sprinkle each potato with Salt, Fresh Ground Pepper and Italian Seasonings to our taste.

Add a dollup of Spicy Salsa on top of each potato.

Sprinkle fresh cut Green Onions over each potato.
Cover each Potato with a generous amount of Old Cheddar Cheese.

They are now ready to go into the oven.

Preheat your oven to 400 degrees.
Cook on middle rack in the oven for about 20 minutes or so or until the Cheese is browned and bubbly and the potato is crispy.

They kind of remind me of little Pizzas!

I served them with a fresh Green Salad.

Bon'Appetit!
To see more posts of Tempt my Tummy Tuesday, please go and visit http://www.blessedwithgrace.net/

Sunday, June 12, 2011

Macro Monday

Maya eats Cake.
At the recent wedding my hubby and I did the photography for, we met Maya. She was a young child that I met when I sat down to take her picture while she was eating cake.


Maya had waited all evening for her piece of cake. She got a side plate of mixed berries that she carefully stacked on top of her cake and then drank the berry juice off the plate.

Her slice of cake was a masterpiece. Just the way she planned and created.

Time to dig in. Every mouthful has to have cake, icing and some of those carefully arranged berries on top. Its all about the cake!

I was fascinated by Maya and her cake. So many times I have passed on the cake for lots of reasons that I thought were good at the time. I denied cake to myself and I denied the pleasure of the experience of eating cake.

We can't have cake, why it would cause weight gain! A simple pleasure in life we deny ourselves for selfish reasons.

Sometimes the guilt of even thinking of having a piece of cake is enough to cause us to turn the cake down. Guilt can make us feel bad, can ruin a good experience and can create in us a pattern of self hate if we break down and give in to the cake. We should of been stronger, we should of had the will power to deny ourself the pleasure of a piece of cake.

I think there might come a day when Maya denies herself the pleasure of endulging in cake, but for now she got so much joy out of a simple treat. She waited patiently for it, she decorated the cake to make it even more enjoyable and she ate it slowly and carefully to enjoy each and every bite.

And she got it all over her face which was just fine too.
I learned something from Maya and her cake. Life is too short. You can have your cake and eat it too, and enjoy it thouroughly while you were at it. Don't guilt your self out of it, its the simple pleasures in life that make life so pleasureable.
To see more photos of Macro Monday please go and visit http://lisaschaos.com/

Sunday, May 15, 2011

Pumpkin Marshmallow Dip - Macro Monday


PUMPKIN DIP
1- 8 0Z. Softened Cream Cheese
1- 14 oz.  Marshmallow Cream
1-15 oz. Canned Pumpkin
1 TBSP. Pumpkin Pie Spice
1 tsp. Vanilla
1 tsp. Orange Zest (optional)


Put all ingredients in a large bowl and use mixer to blend until smooth.

Put blended dip in serving bowl and there you are.

Serve the dip with Gingersnap cookies or Cinnamon Snaps to dip in.

I don't know how appetizing this looks but it is really good!!
I am taking this tonight to next door for Survivor. We are having our last Survivor night.
Who do you think will win the Million Dollars???
To see more photos of Macro Monday, please go and visit http://lisaschaos.com/

Sunday, April 24, 2011

Taco Dip - Straight out of the Camera

 
I thought today was a good opportunity to add something yummy to SOOC with my Taco Dip. I took the photos quite a while ago but never had the chance to do anything with the photos and put them up here. I made this dip a couple of weeks ago for an appetizer for our Survivor night.
TACO DIP
1 1/2 LB. Ground beef
1 medium Onion, chopped
1 large Jalepeno, finely chopped
5 cloves Garlic, minced
Brown ground beef, onion, jalepeno and garlic in skillet until onions are soft and beef is no longer pink.

1 envelope of Taco Seasoning
1/2 cup Water
Sprinkle Taco Seasoning over top of beef mixture, add water and simmer mixture for a few minutes to thicken and evaporate excess moisture.

1 16 oz. can Refried beans.
Spread a can of Refried Beans into the bottom of your dish. A 9x13 in. baking dish works good. I made two dishes for this but you don't have to!!

Add your ground beef mixture evenly over top of the refried bean layer.

1 8 oz. container Sour Cream
Dollup sour cream evenly over ground beef layer and spread it over top of your ground beef layer.

Spread on 8 oz jar of Taco Sauce or Salsa over top of the sour cream layer.

One small container of Cherry Tomatos, quartered
1 oz. tin Sliced Black Olives
Evenly spread olives and tomatoes over top of the Taco sauce layer.

Top with a generous layer of Aged Cheddar Cheese and Mozzarella mixture. The more cheese the better!!
Bake at 350 degree oven for about 30 minutes or until it is very hot and bubbly and cheese is golden brown!
Eat with Tortilla Chips!

I swear it is the cheese giving it this orange glow, not my camera!!!!
This dip could be a meal, it is that good. Hope you try it out and enjoy!!
To see other Straight out of the Camera photos, please go and visit http://www.murrieta365.com/

Wednesday, March 9, 2011

Chicken Curry Dip

CHICKEN CURRY DIP
1 lb. Ground Chicken
1 medium chopped Onion
1 TBSP. Grated fresh Ginger
3 or 4 minced Garlic Cloves
1 tsp. Ground Cumin
1 1/2 tsp. Curry Powder
1/2 tsp. Pepper and 1/2 tsp. Salt
Fry all the above ingredients together until chicken is cooked and onions are browned well. Add the mixture to a large bowl.
Combine with:
8 oz. Cream Cheese, softened
1 Cup Grated Mozzarella
1/4 cup Golden Raisons
1/4 cup Mayonaise
1/4 cup chopped Green Onions
1 TBSP. Curry Powder or to taste.
Mix all ingredients together well and scoop the mixture into a Corning Ware 8x8 pan. Bake in the oven at 400 degrees for 18 to 20 minutes.
This comes out of the oven looking like this!
Onto the next step....

Cool baked dip for a couple of minutes until the bubbling stops, then spread the entire top of the dip with Mango Chutney.

This one will do! Spread a good thick layer of it over the top of the dip.
Here is what it will look like.
Now that the dip is covered with Mango Chutney it is ready for its final topping.
TOPPING:
1/4 Cup Sweetened Flaked Coconut
1/4 Cup Slivered Almonds
Garnish with Chopped Green Onions

And its ready to eat!
You can serve this warm dip with Pita Chips or Slices of Naan.
This dip has it all, sweet, salty, savoury and spicy. I am sure you will love it!
Enjoy!!